
Data center campus: what should GenAnywhere map before review?
The layers worth putting on the table before a data center campus goes into a design or planning review.
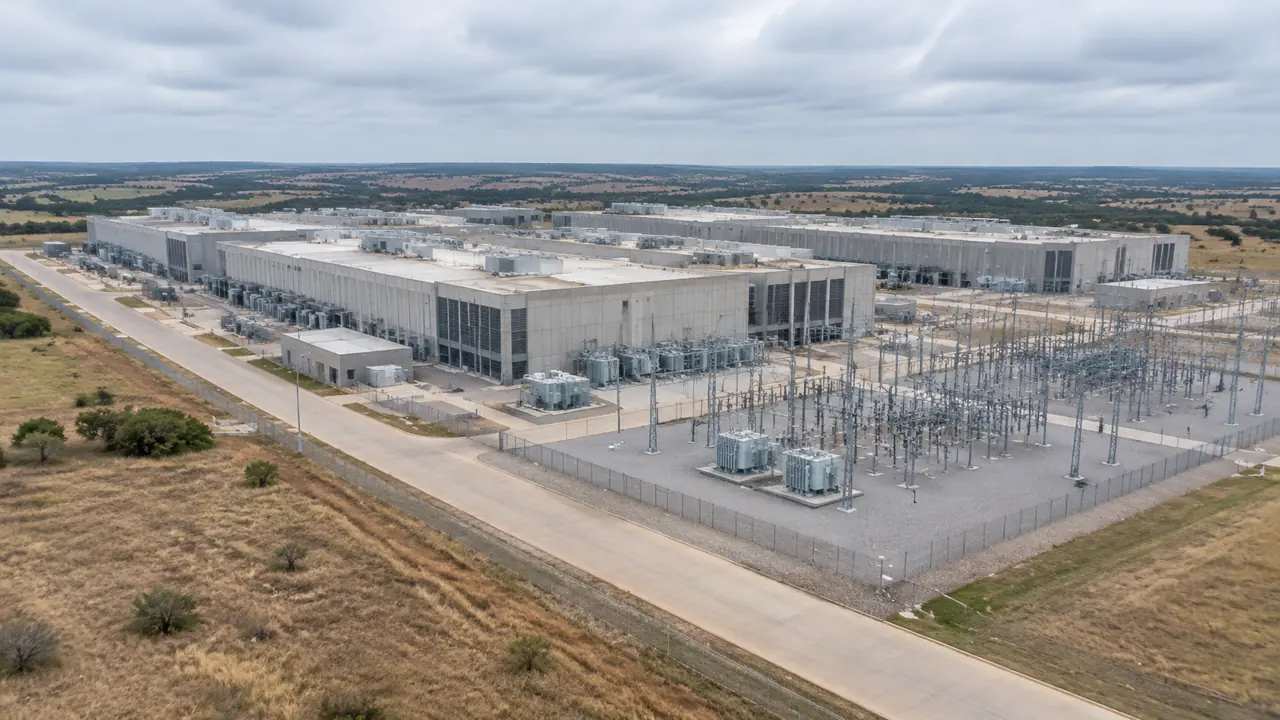
A data center campus review goes better when the site context is visible before the buildings are. Map the parcel edges, the utility yards, the access routes, the low ground, and the buffers in one model, then use that model to frame questions. GenAnywhere can generate that context from map and satellite data in a few passes, and it can show you quickly which parts of the site deserve a closer look.
1 Map the parcel before the buildings
The parcel is the frame that everything else hangs from. Fences, setbacks, easements, and the line where landscaping becomes a buffer all depend on it. Teams often start with the building block because it is the interesting part, then discover halfway through that the site boundary was drawn loosely. That discovery usually costs a week.
1.1 Fix the site boundary and the setbacks
Draw the parcel as the record shows it, then note the setbacks that apply on each side. Where the parcel line is uncertain, mark it as provisional in the model notes rather than smoothing it into a confident shape. A site model built from imagery will place building footprints well enough for a campus discussion, but it will not resolve a boundary dispute. Keep the two kinds of information separate.
1.2 Check what the parcel touches
Look at the edges. A campus pressed against a residential street has a different conversation ahead of it than one surrounded by warehousing and rail. Note the roads that touch the site, the properties that share a fence, and any public land along the perimeter. Those adjacencies shape the review agenda more than the internal layout does in the early stages.
2 Show the parts that carry utilities
A data center campus is mostly support space around a hall of racks. The switchyard, generator yard, cooling equipment, and fuel storage take up ground and drive the site plan. If the model shows nothing but the main building, the review will keep circling back to the parts that are missing.
2.1 Give the plant yard its own area
Set aside a clear zone for electrical and mechanical equipment, and draw it as a block in the model even when the details are not settled. The zone tells reviewers where the heavy equipment will sit and how much land it consumes. It also exposes conflicts early, such as a generator yard that lands on the main access road or blocks a future building.
2.2 Trace the routes in and out
Utility corridors rarely stop at the fence. Draw the connections to the nearest substation, water main, or fiber route as simple lines on the site plan, and check where they cross roads or other infrastructure. The point is not to engineer the connection. It is to make sure the campus layout does not put a building on top of the corridor everyone assumed was available.

3 Cover access, parking, and turning
Vehicles do a lot of work on a data center site: staff cars, delivery trucks, fuel tankers, and maintenance vans. Each has a different turning need. A layout that works for cars can fail badly for a fuel truck, and that failure is easier to spot in a three-dimensional view than in a parking schedule.

3.1 Test the main entrance approach
Start from the public road and follow the route to the gate. Look at the turn radius, the queuing space, and the distance from the gate to the guard post. If the entrance sits on a fast road with no deceleration lane, note it as an open question for the transport engineer. The model will not design the junction, but it will show how the site layout depends on it.
3.2 Reserve space for service vehicles
Mark the loading area, the fuel delivery point, and the maintenance parking as separate zones. Check that a large vehicle can enter, turn, and leave without reversing across a pedestrian route. In a massing model, a simple swept path drawn as a band on the ground is enough to start the conversation. Refine it later with the people who operate the site.
4 Put terrain and drainage in view
Flat is a relative term. A site that looks level on a map can hide a fall of several metres across the pad, and that fall decides where water goes. Terrain is also the layer that most often gets dropped from a review model, which is a shame, because it changes how every other layer reads.
4.1 Read the slopes across the pad
Generate the terrain with the buildings and look at the contours around the proposed pad. Note where the ground rises at the back of the site and where it falls toward a road. A building platform cuts into the high side and fills the low side, and both moves show up in the model even at a coarse level. Flag the edges where the change is largest.
4.2 Watch the low corner
Every site has a low corner. Find it and check what sits there in the current layout, whether that is a parking row, a transformer yard, or a service road. The low corner is where water collects during a storm, and it is worth knowing before the layout hardens. A site model can show the shape of the ground; the drainage design still belongs to the civil engineer.
5 Mark the buffers that shape the review
Buffers are where the campus meets its neighbors, and they carry most of the public discussion. Distance, screening, and the way the buildings present themselves all matter. None of these can be settled in a massing model, but all of them can be made visible.
5.1 Check the distance to the nearest homes
Measure from the building edge to the nearest residential property and note the gap in the model notes. A generous gap gives the landscape design room to work; a tight one puts pressure on every other decision. Reviewers will ask about this distance early, so it helps to have a consistent answer rather than a rough guess from memory.
5.2 Note screening and landscape bands
Mark the bands where planting, berms, or fences are expected. Keep them as zones rather than detailed designs, and describe what each band is meant to do: screen a yard, soften a facade, or separate a service route from a public path. The International Energy Agency tracks how data centre demand is growing, and its work on data centres and networks is useful background when a review turns to power and cooling context.
6 Prepare a campus model in GenAnywhere
GenAnywhere builds an editable 3D site model from a mapped area using satellite and map data. It reads building footprints, estimates heights, infers building types, and includes surrounding vegetation, with terrain, water, and buildings available as separate layers. You can replace a building, move or rotate it, and adjust its height or type before exporting a GLB for 3D, BIM, GIS, or game engine workflows. The model is initial site context. It does not verify utility capacity, and it does not replace the surveys and studies a campus review requires.
6.1 Build the current condition
Select the campus and a margin of surrounding land, then generate the model. Look at what already exists on the site and around it: sheds, yards, access roads, tree cover. Save this version as the current condition. It becomes the reference point for every option that follows, and it keeps the discussion honest about what is being replaced.
6.2 Adjust the massing before the meeting
Move the main building block, add a plant yard, or shift a parking area, and compare the result with the current condition. Work in layers so you can switch the terrain or vegetation on and off while you talk. If a reviewer asks what happens when the building moves ten metres, you can show it rather than describe it, which shortens the meeting.
6.3 Export for the engineering team
Export the massing as GLB and hand it to the people who will run the utility, drainage, and traffic studies. Keep a short note with the file that lists what was assumed, what was estimated, and what still needs confirmation. The model gives those specialists a shared picture of the site, and they can replace the placeholder zones with real designs as the work progresses.
See how the site model workflow fits a review
7 FAQ
FAQ-1 What should be mapped before the design starts?
Map the parcel, the building footprints that already exist, the terrain, the vegetation, the roads that touch the site, and the utility corridors you know about. Add the plant yard as a placeholder zone. That set gives a review enough context to ask useful questions. Anything beyond it, such as capacity or soil conditions, comes from the specialists who own those studies.
FAQ-2 Can the model show utility capacity?
No. The model shows where equipment and corridors sit on the ground, not how much power or water they can carry. Capacity comes from the utility operator and the engineering team. Use the model to check that the layout leaves room for the equipment and the connections, then take the capacity question to the people who can answer it with records and calculations.
FAQ-3 How do I handle a site with existing buildings?
Generate the model and keep the existing buildings as the current condition. Then duplicate the site and edit the copy, so the before and after views stay separate. Existing footprints are read from imagery, so check the important ones against a survey or a site visit. Small structures are sometimes merged or missed, and that matters when a demolition plan depends on them.
FAQ-4 What file do I hand to the review team?
The model exports as GLB and opens in common 3D, BIM, GIS, and game engine tools. Add a note that lists the assumptions and the estimated values, and attach the site plan you used for the boundary. The export carries a permanent commercial license, but the original files cannot be resold or used for AI training. Third-party data inside the model may have separate terms.
Content and technical notes
This article was prepared by the GenAnywhere team with AI-assisted drafting and human review.
Product features, formats, and availability change as the platform evolves; refer to the official GenAnywhere website for current details.
For technical questions or corrections, contact support@genanywhere.com.
Last reviewed: 2026-11-20.