
Semiconductor fab site: what should teams check in GenAnywhere?
A short list of site checks that help a fab search move from spreadsheets to a shared three-dimensional view.
A fab site fails on land long before it fails on process. Teams check the pad size, the expansion land, the utility yards, the freight access, and the neighbors, and those five checks are easier to run together in one model than in five separate files. GenAnywhere can assemble a site view from map and satellite data, which gives a search team a common picture before the engineers arrive.

1 Check that the parcel can hold a large footprint
A modern fab building is long, deep, and repetitive. The footprint is usually the constraint that eliminates a site, not the total acreage. A parcel can be large and still be useless if it is split by a road, shaped like a wedge, or hemmed in by a rail line that cannot be crossed.
1.1 Compare the pad with the building block
Draw the building block at a realistic size and place it on the parcel. Look at what remains: the utility yard, the parking, the access roads, the stormwater areas. If the block fits but the support space does not, the site has a problem. Working in three dimensions makes that shortfall obvious, especially on parcels that look generous in a plan view.

1.2 Look at the expansion land
Fabs grow. A site that cannot hold a second building, or a second phase of the same building, will be judged on that limit even if the current program fits. Mark the land that could take an expansion and check that it is not the land the utility yard needs. The two demands often compete for the same flat, well-drained corner of the site.
2 Map the utility yard as part of the site
The utility yard is not a leftover space. It holds the equipment that keeps the building running, and it needs its own layout, access, and buffer. When a site model omits the yard, the review quietly assumes the equipment will fit somewhere, and that assumption tends to fail late.
2.1 Give the plant yard its own area
Set aside a zone for electrical, mechanical, and gas equipment, and draw it as a block with a generous edge. The block does not need internal detail at this stage. It needs to be visible, so the site plan can be tested against it. A yard that overlaps the main building or the truck route is a planning problem, not a detail to solve later.
2.2 Keep the connection routes visible
Draw the corridors between the yard and the building, and between the site and its utility sources. These routes are often the reason a parcel is attractive or not. A site close to a substation but cut off by a motorway may be worse than a site further away with a clear corridor. Put the routes on the model so the trade-off is visible to everyone in the room.
3 Trace how people and goods arrive
A fab site handles staff shifts, chemical deliveries, gas deliveries, and waste removal. Each stream arrives at a different time and with different vehicle sizes. Mixing them at one gate creates a queue that grows with the shift change, and the layout should show that risk before it is built into the site plan.
3.1 Separate staff and freight entries
Give the staff entrance and the freight gate different locations if the site allows it. Staff arrive in waves and need parking near the entrance. Freight arrives on schedules and needs a holding area away from pedestrians. In the model, mark both gates and trace the routes behind them. A crossing between the two is worth flagging in the notes.
3.2 Check the last turn into the gate
The final turn from the public road into the site is where large vehicles struggle. Look at the radius, the sight lines, and the space behind the gate for a vehicle to clear the road. If the site sits on a fast road, the turn may need a dedicated lane, and that lane consumes land the layout may have assigned to something else.
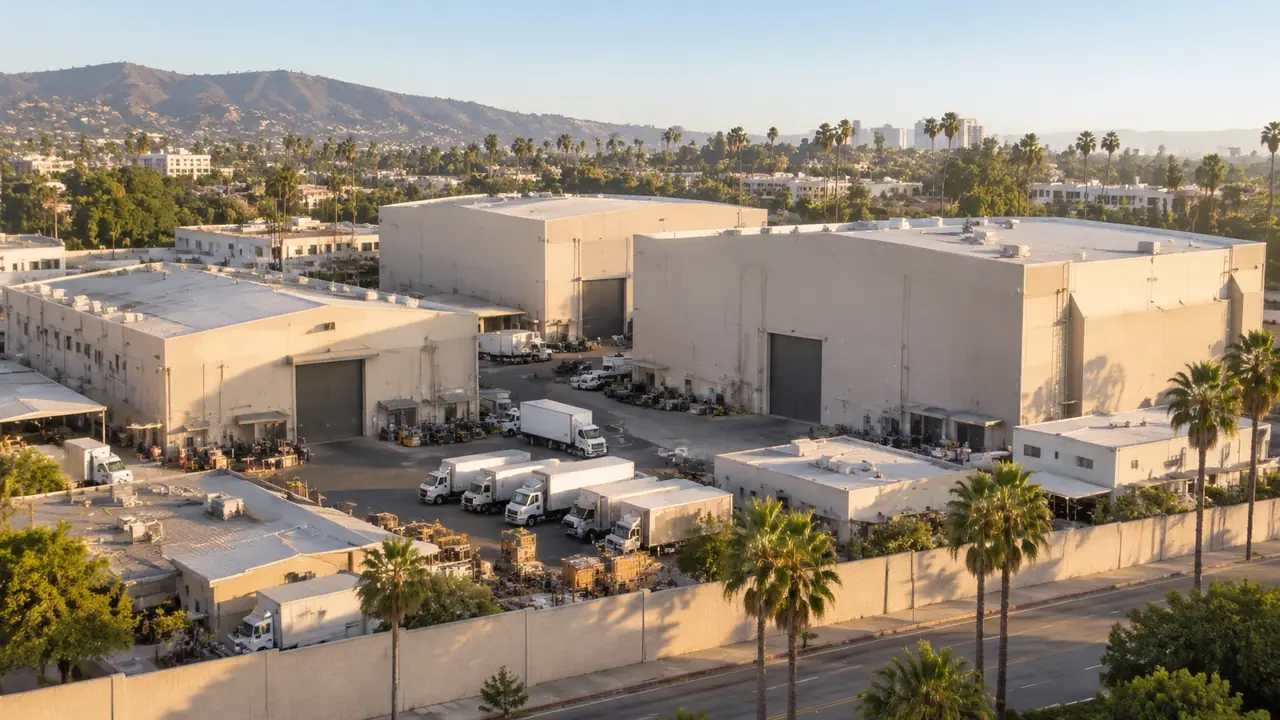
4 Read the ground and the surrounding fabric
The ground under a fab site matters more than it does for most buildings because the pad is large and flat. A site with a gentle cross-fall can be graded without moving much earth. A site with a ridge through the middle will need a cut that changes the whole layout. Neither condition is visible in a spreadsheet of acreage.
4.1 Watch cut and fill across the pad
Generate the terrain with the buildings and look at where the pad meets the natural ground. The high side will be cut and the low side filled, and the difference shows in the model as a visible slope or step. Mark the areas where the change is large. Those areas often become retaining walls, and retaining walls are expensive to discover after the layout is fixed.
4.2 Note neighbors that constrain the edges
Look at what sits beyond the fence: housing, schools, farmland, another industrial site, a watercourse. Each neighbor brings a different set of expectations to a review. A buffer beside housing needs more width and more planting than a buffer beside a warehouse. Mark the edges by neighbor type, and the buffer conversation starts from facts rather than assumptions.
5 Use the model for screening, not sign-off
A site model is a screening tool. It helps a search team compare parcels, spot constraints, and prepare questions for the specialists. It does not certify a site, and it does not replace the geotechnical, environmental, utility, or traffic work that a fab decision requires. The value comes from asking better questions earlier.
5.1 Keep the assumptions visible
Every model carries assumptions: estimated heights, inferred building types, a parcel line drawn from a public record. Write them down and keep the note with the file. A reviewer who sees the assumptions can judge how much weight to give the view. A reviewer who does not see them may treat the model as a survey, which is the one thing it is not.
5.2 Hand the model to the specialists
The site view is most useful when it reaches the people who will run the engineering studies. Export it, add a note on what is known and what is not, and let the geotechnical, environmental, and utility teams use it as a shared frame. Industry bodies such as SEMI publish material on fab planning and construction practice that can help a team frame those questions.
6 Build a fab site view in GenAnywhere
GenAnywhere generates an editable 3D site model from a mapped area using satellite and map data. It identifies building footprints, estimates heights, infers building types, and captures the surrounding vegetation. Buildings, terrain, vegetation, and water can be previewed and edited as layers, and any building can be replaced, moved, rotated, or retyped. The model exports as GLB for 3D, BIM, GIS, and game engine workflows. It gives an initial site context, not a survey or an engineering study, so treat the pad and the yard blocks as placeholders until the specialists weigh in.
6.1 Generate the site and the existing context
Select the parcel with a margin that includes the neighboring land, then generate the model. Look at the existing buildings, the access roads, and the tree cover before you add anything. This view is the baseline for the search, and it is worth saving under a name that includes the parcel reference and the date, because the team will compare it with other sites later.
6.2 Reshape the block and the yard
Place the building block and the utility yard, then move them until the support space fits. Test the expansion land by adding a second block and seeing what it displaces. If a layout forces the yard onto the one flat corner, the model will show it, and that is the kind of finding a search team can act on before a site visit.
6.3 Export for the engineering team
Export the model as GLB and share it with the engineers who will assess the site. Keep the assumptions in a short note and mention the questions the model raised. The file carries a permanent commercial license, but it cannot be resold and cannot be used for AI training. Third-party data inside it may have separate terms, so check those before the model travels outside the team.
See how the site model workflow fits a review
7 FAQ
FAQ-1 How large a parcel should I model?
Model the parcel plus a margin of surrounding land, so the roads, neighbors, and any adjacent development are visible. The margin matters as much as the parcel, because a site is judged by what it touches. You do not need to model the whole district. A few hundred metres around the boundary is usually enough to see the constraints that shape a fab search.
FAQ-2 Can the model tell me if the site is suitable?
No. Suitability depends on geotechnical conditions, environmental records, utility capacity, and a long list of studies that a site model cannot perform. What the model can do is make the visible constraints clear, so the studies start with better questions. Use it to shortlist and to brief, not to decide.
FAQ-3 What about the utility yard in the model?
Draw it as a block with a generous edge, even if the internal layout is unknown. The block reserves the land and shows the conflicts. When the engineers arrive, they can replace it with a real layout, and the site plan will already have accounted for the space. Leaving it out invites a late surprise.
FAQ-4 How do I compare two sites quickly?
Build both models with the same parcel margin, the same building block size, and the same camera. Then compare the support space, the expansion land, and the access routes side by side. A consistent method makes the differences real rather than a matter of how each model happened to be framed. Keep the assumption notes with both files.
Content and technical notes
This article was prepared by the GenAnywhere team with AI-assisted drafting and human review.
Product features, formats, and availability change as the platform evolves; refer to the official GenAnywhere website for current details.
For technical questions or corrections, contact support@genanywhere.com.
Last reviewed: 2026-11-20.