
Quarry redevelopment: how should GenAnywhere map terrain?
How to get a pit, its benches, and its water into a usable site model, and where the geotechnical work begins.
A quarry is a terrain problem before it is a design problem. The pit walls, the benches, the floor, and the water at the bottom set the limits for everything that follows. GenAnywhere builds terrain from map and satellite data, which gives a redevelopment team a working surface for the whole site. The model is a starting point, since a generated surface smooths some of the detail that a survey would capture.
1 Read the pit before you draw anything
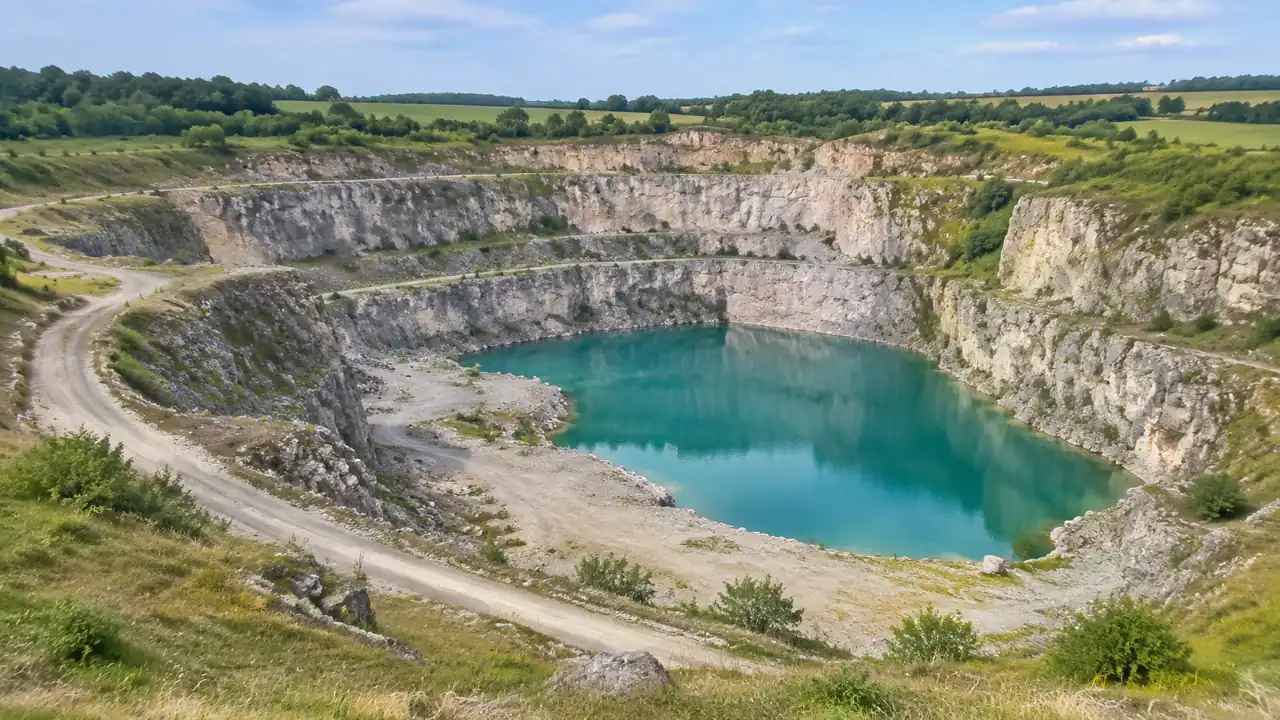
Quarry sites have a logic. The extraction followed a seam or a deposit, the benches follow the working face, and the haul roads connect the floor to the rim. Read that logic before you place a single building, because a proposal that ignores it will fight the ground at every step.
1.1 Follow the benches and the walls
Look at the benches in the terrain and trace them around the pit. Each bench marks a working level, and each wall marks the face that was cut. The spacing between benches tells you roughly how steep the site is, and the shape of the walls tells you where the working face advanced. Mark the steepest sections, because those are the ones that will constrain access and building placement.
1.2 Find the floor and the water
The floor is the flat area at the bottom, and it is often the most buildable part of the site. Water may sit in part of it, which changes what the floor can hold. Mark the waterline in the model and note whether it looks seasonal in the imagery. A floor that floods in winter is a different design problem from a dry floor, and the difference is visible before any study.
2 Build terrain that matches the imagery
A generated terrain surface follows the data it is given. In a quarry, that data may be sparse on the steep walls and dense on the open ground. Knowing where the model is likely to smooth or miss detail helps you decide which parts to trust and which parts to check.
2.1 Check the rim against the map
Compare the model's rim with the imagery and with the site boundary. The rim is where the pit meets the surrounding land, and it is usually the most reliable part of the generated surface. If the rim is in the wrong place, everything inside it shifts. Check it at several points around the pit before you build anything on the site.
2.2 Watch where the model smooths
Generated terrain tends to smooth narrow features: small gullies, bench edges, the lip of a wall. Look at the model from a low angle and see whether the bench edges still read as steps. Where they do not, note the area and plan a site check. The smoothing is not a defect for a massing study, but it matters when a design depends on the exact position of an edge.
3 Place access where the grades allow
Access decides what a quarry site can become. The haul roads were built for trucks, and they often provide the sole routes with workable grades. Reusing them is usually cheaper than cutting new ones, but the old routes may not lead where a new use needs to go.
3.1 Test the haul route
Follow the old haul route from the rim to the floor in the model and note the grade. A route that works for a truck may still be too steep for a public road or a pedestrian path. If the route is the main way in, the design has to respect its geometry. If a new route is needed, the terrain will show where the cut would be large.
3.2 Find the second way out
A single access point is a risk on any site and a serious one in a pit. Look for a second route, even a rough one, that could be improved. On a quarry site, the second route is often an old bench road that connects to the rim on the other side. Mark it in the model and check how much work it would need.
4 Compare reuse options on the same ground
Quarry redevelopment options tend to fall into two families: fill the floor and build a flat pad, or work with the terraces and build on the benches. Each family has a different relationship with the terrain, and comparing them in one model shows the trade-off in a way a plan cannot.
4.1 Test a flat pad and a terraced scheme
Place a flat pad on the floor in one version and a series of blocks on the benches in another. The pad version uses the flattest ground but may need a large retaining edge. The terraced version uses the shape of the pit but may need more access routes. Compare the two views with the same camera and note what each one takes from the site.
4.2 Keep the water in view
Water at the bottom of a pit is a design feature and a constraint at the same time. Keep the water layer visible in every option, and check whether a building block lands in it. If the water is the centerpiece of the scheme, the layout should face it. If it is a problem, the layout should avoid it. The model makes the choice explicit. The U.S. Office of Surface Mining Reclamation and Enforcement publishes guidance on mine land reclamation that can help a team frame the questions.
5 Separate the terrain view from the engineering
A generated terrain surface is a visual model, not a geotechnical record. Slope stability, groundwater, and the condition of the pit walls are engineering questions, and they decide what can be built and where. The model helps you ask those questions in the right places, and it should not be asked to answer them.
5.1 Slopes and stability need specialists
A steep wall in the model may be stable or not, and the model cannot tell the difference. A bench that looks generous may sit on material that will not support a building. Take the model to a geotechnical engineer early, and mark the areas where the design depends on the answer. That conversation is cheaper at the concept stage than after a layout is fixed.
5.2 Record the assumptions
Write down what the model assumes: the source of the terrain, the date of the imagery, the places where the surface was smoothed, and the areas that still need a site check. Keep the note with the file. A redevelopment team that inherits the model will need those notes to know how much weight to give each part of the surface.
6 Map a quarry site in GenAnywhere
GenAnywhere builds an editable 3D site model from a mapped area using satellite and map data. It identifies building footprints, estimates heights, infers building types, and includes the surrounding vegetation, with terrain, water, buildings, and vegetation as separate layers. You can replace a building, move or rotate it, adjust its height or type, and export a GLB for 3D, BIM, GIS, or game engine workflows. The model is initial site context. It does not replace a topographical survey, and it does not assess slope stability.
6.1 Select the pit area
Frame the pit with the rim and the surrounding land, then generate the model. Look at the terrain before you add buildings, and note where the benches and the walls read clearly. Save this version as the baseline. It is the surface every option will sit on, so it is worth spending time on the frame rather than rushing to the design.
6.2 Reshape the terrain and the buildings
Place a building block on the floor or on a bench and see how it meets the ground. If the block floats or sinks, the terrain needs a closer look. Move the block, adjust the height, and compare the result with the baseline. The terrain itself can be edited in the model, which makes it possible to test a filled pad without leaving the site view.
6.3 Export for the design team
Export the model as GLB and hand it to the design and engineering teams with a note on the terrain assumptions. Mark the areas where the surface was smoothed and the places that need a site check. The file carries a permanent commercial license, but the original files cannot be resold or used for AI training. Third-party data inside the model may have separate terms.
See how the site model workflow fits a review
7 FAQ
FAQ-1 Can GenAnywhere map a deep quarry?
It can generate a terrain surface from the available map and satellite data, and the pit usually reads well at the level of benches and walls. Deep pits may have gaps in the data, so check the walls against imagery and plan a site visit. For a design that depends on the exact shape of a face, use a survey rather than the generated surface.
FAQ-2 How accurate is the terrain?
The surface is an estimate built from public data, not a survey. It is good enough to compare options and to see where the ground rises and falls. It is not good enough to set levels, size retaining structures, or settle a boundary question. Treat it as a visual model and confirm the numbers with a surveyor before the design moves forward.
FAQ-3 Can I fill the pit in the model?
You can edit the terrain to show a filled pad, which helps test a scheme that raises the floor. The edit is a design assumption, not an engineered fill. Keep the original terrain as a separate version so the two can be compared, and take the fill question to the geotechnical engineer with both views.
FAQ-4 What should I check before an initial site visit?
Check the rim against the map, look for gaps in the walls, find the water and the floor, and trace the existing access routes. Mark the places where the model smoothed a feature. That list turns a general visit into a set of specific checks, and it usually saves a second trip to the site.
Content and technical notes
This article was prepared by the GenAnywhere team with AI-assisted drafting and human review.
Product features, formats, and availability change as the platform evolves; refer to the official GenAnywhere website for current details.
For technical questions or corrections, contact support@genanywhere.com.
Last reviewed: 2026-11-20.